

Download ROOT Moto Edge Lite, Nairo, Motorola One 5G, XT2075, International Variants
Download TWRP Moto Edge Lite, Nairo, Motorola One 5G, XT2075, International Variants
ROOT+TWRP Motorola Moto G 5G Plus Android 10
ROOT+TWRP Motorola Moto G 5G Plus XT2075 Android 10
تحميل روت وريكفري معدل XT2075
How to Root Motorola Moto G 5G Plus Android 10 (Moto Edge Lite, Nairo, Motorola One 5G, XT2075, International Variants)
First of all, thanks to the developer for the Root method- Vache and topjohnwu – this genius is one who discovered and maintaining Magisk. Moto G 5G Plus International variants come with a flexible bootloader. It means that the smartphone can be easily rooted. The device can also accept installing TWRP recovery or any other custom recovery file/app.
In the below method, we are going to Root this device by using TWRP and Magisk. The process uses Unofficial TWRP. You can install Official TWRP using the official app when it is released. TWRP recovery is a custom recovery file that must be installed on your devices because you can root them successfully. This article explained the easiest method to follow and install Magisk on Moto G 5G Plus. However, the tool required for rooting this device is the Magisk App.
You can flash official TWRP once it is available. With the help of TWRP Recovery, you can quickly flash the Custom ROMs into your Moto G 5G Plus. Before sharing the tutorial, you may want to know that you can easily install any root apps with the Magisk present on your device. Does it seem complicated? Relax; everything will be explained briefly in bullets.
Things to check out for;
Check your device model number.
- You should back up your current files and data- Full Data Loss Process (save them on external storage).
- Install Latest Magisk Manager.
Make sure your device battery is above 50%
- You cannot use Google Pay, Secured folder, and some official apps from Motorola.
- You can’t update your firmware; to get new firmware, you must follow the below steps with the latest firmware.
- Read the full tutorial before the process.
1.Unlock Bootloader Moto G 5G Plus using ADB and Fastboot
Download and install the Moto USB driver to your computer system.
Also, download the ADB drivers. Install it on your PC.

- Switch off your device. Then, enter into Fastboot mode. To do this- Press and hold down the Volume Down + Power buttons at the same time for some time.

Press the Volume Up button to continue when you see the warning message.
Now, connect the Moto G 5G Plus mobile to the computer via USB cable.
Launch the fastboot on your computer. Open a Command prompt on your PC and type the below command.
- fastboot devices
- It should display the connected devices. If you didn’t get the device, restart the command prompt and Disconnect and Connect your Moto G 5G Plus. If you are detected, type the below commands.
- fastboot oem get_unlock_data

- Hit enter, you will get some unlock data. Copy those codes and remove < Bootloader> Prefix from those lines and copy them into one line.
- Go to Official Moto Unlock Page. Log in with your Moto account and in the Box, Paste those codes and Check the unlock Bootloader Status. If you get, Yes, you can unlock; you can request unlock Key from Moto.
After the process completes, you will get 20 Digit to unlock the key in your email. Now type the following command to unlock the Bootloader on your device.
- fastboot oem unlock UNIQUE CODE

You should type this code two times and Hit enter to unlock your device successfully. After the successful unlock, your device will automatically reboot to the standard OS.
- Check again to enable “Developer Options,” then go to the “Developer Options” and enable USB Debugging Mode, OEM Unlock and Enable the “Advanced Reboot.” Sometimes they disabled themselves after the boot.
2. Necessary Download files
- Download the Moto G 5G Plus TWRP A10.zip and extract the .img file, rename the twrp file to recovery.img, copy the file to your PC ADB folder. Copy recovery.img file to mobile external storage.
- Download Disable_Dm-Verity_ForceEncrypt.zip and Magisk.zip files (Don’t download .apk file), copy it on your external SD card, or Pendrive With OTG Cable. You can refer to the uses of OTG.
3. Flash TWRP using ADB and Fastboot
- Switch off your device. Then, enter into Fastboot mode. To do this, press and hold down the Volume Down+ Power buttons after Android Logo Appears. Still press the Power button and press the Volume Up Button.
Now, connect the Moto G 5G Plus to the computer via USB cable.
Launch the fastboot on your computer. Open a Command prompt on your PC and type the below command.
- After Entering into Bootloader on your mobile, type the below command.
- fastboot devices
- It should display the connected devices. If you didn’t get the mobile, restart the command prompt and Disconnect and Connect your Moto G 5G Plus; if you are detected, type the below commands and hit enter.
- fastboot flash recovery_a twrp.imgfastboot flash recovery_b twrp.img

- The above commands will flash TWRP recovery in your mobile; Type the below command to boot into recovery.
- fastboot boot recovery.img
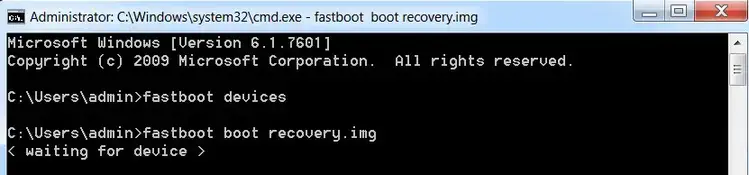
- After the process complete, It will boot into the temporary TWRP. Don’t Boot into standard OS until we flash magisk.
3.1. Install Magisk, DM-Verity, and TWRP Image file in your Moto G 5G Plus using TWRP

- Now you are in TWRP Recovery Mode.
- Select Wipe->Advance Wipe->Select Cache Data. You can also take complete backup using TWRP. It will help you when something goes wrong.
- Navigate to Home of TWRP select Install.
- Select Disable_Dm-Verity_ForceEncrypt.zip.
- Return to Home of TWRP select Advanced.
- Select “Install Recovery Ramdisk”, select recovery.img. This installation is optional; We do this flash to avoid the temporary twrp loss.
- Return to Home of TWRP select Install.
- Select Magisk.Zip.
- After the Installation goes to Advanced and select “fix recovery boot loop.” Reboot Your Mobile.
- You should Install them One by One. Don’t add more zips feature in TWRP. After the Installation, Reboot Your Mobile.
- You can also install Magisk Manager in your Mobile Applications. Install Root checker to check your Root status.
- If you didn’t find Magisk in App Drawer, you should Install the Magisk app again.

